 MapConductor
Your first map with MapLibre
How to render a MapLibre map with MapConductor. Setup differs per platform, but the code that draws the map and its overlays follows the same model everywhere.
01 · Install
Add core and for-maplibre to your dependencies. Using another provider means swapping that one module.
dependencyResolutionManagement {
    repositories {
        google()
        mavenCentral()
    }
}dependencies {
implementation(platform("com.mapconductor:mapconductor-bom:1.3.1"))
implementation("com.mapconductor:core")
implementation("com.mapconductor:for-maplibre")
// optional: compose / icons / heatmap / marker-clustering / geojson / kml
}dependencies: [
.package(url: "https://github.com/MapConductor/ios-sdk-core", from: "1.3.1"),
.package(url: "https://github.com/MapConductor/ios-for-maplibre", from: "1.3.1"),
].target(
name: "YourApp",
dependencies: [
.product(name: "MapConductorCore", package: "ios-sdk-core"),
.product(name: "MapConductorForMapLibre", package: "ios-for-maplibre"),
]
)npm install @mapconductor/js-sdk-core \
@mapconductor/js-sdk-react \
@mapconductor/react-for-maplibreimport { defineConfig } from 'vite';
import react from '@vitejs/plugin-react';
export default defineConfig({
optimizeDeps: {
exclude: ["@mapconductor/react-for-maplibre", "@mapconductor/js-sdk-core"],
},
plugins: [react()],
});Keep the provider out of Vite's dependency pre-bundling. maplibre-gl v6 loads its worker by URL, and pre-bundling does not emit that worker file into .vite/deps, so the request fails.
02 · Choose your tiles
MapLibre itself needs no API key — how the map looks depends on where the tiles come from.
Start on demo tiles
Pass MapLibreDesign.DemoTiles or OpenMapTiles to get a working map with no key at all.
Host tiles for production
For a hosted service such as MapTiler, put that service key in the style URL.
Demo tiles are for verification only. Use your own or a commercial tile service in production.
03 · Hello Map
Create a state object holding the camera position and hand it to the map view. Overlays — the marker and its info bubble — are declared as children: tapping the marker shows the bubble, tapping the map dismisses it.
@Composable
fun SimpleMapScreen(modifier: Modifier) {
    var selected by remember { mutableStateOf<MarkerState?>(null) }

    val mapState = rememberMapLibreMapViewState(
        cameraPosition = MapCameraPosition(
            position = GeoPoint(35.6812, 139.7671),
            zoom = 14.0,
        ),
        mapDesign = MapLibreDesign.OsmBright,
    )
    val markerState = remember {
        MarkerState(
            position = GeoPoint(35.6812, 139.7671),
            onClick = { selected = it },
        )
    }

    MapLibreMapView(
        modifier = modifier,
        state = mapState,
        onMapClick = { selected = null },
    ) {
        Marker(markerState)
        selected?.let {
            InfoBubble(marker = it) { Text("Hello, MapConductor") }
        }
    }
}import SwiftUI
import MapConductorCore
import MapConductorForMapLibre
struct ContentView: View {
@StateObject private var mapState = MapLibreViewState(
mapDesignType: MapLibreDesign.OsmBright,
cameraPosition: MapCameraPosition(
position: GeoPoint(latitude: 35.6812, longitude: 139.7671),
zoom: 14
)
)
@State private var selected: MarkerState?
var body: some View {
MapLibreMapView(state: mapState, onMapClick: { _ in selected = nil }) {
Marker(
position: GeoPoint(latitude: 35.6812, longitude: 139.7671),
onClick: { selected = $0 }
)
if let selected {
InfoBubble(marker: selected) { Text("Hello, MapConductor") }
}
}
}
}import { useMemo, useState } from 'react';
import { createGeoPoint, createMapCameraPosition, createMarkerState }
from '@mapconductor/js-sdk-core';
import { InfoBubble, Marker } from '@mapconductor/js-sdk-react';
import { MapLibreDesign, MapLibreMapView, useMapLibreViewState }
from '@mapconductor/react-for-maplibre';
import '@mapconductor/react-for-maplibre/style.css';
const TOKYO = createGeoPoint({ latitude: 35.6812, longitude: 139.7671 });
export function HelloMap() {
const mapState = useMapLibreViewState({
mapDesignType: MapLibreDesign.OsmBright,
cameraPosition: createMapCameraPosition({ position: TOKYO, zoom: 14 }),
});
const [selected, setSelected] = useState(false);
const marker = useMemo(() =>
createMarkerState({
id: 'hello',
position: TOKYO,
onClick: () => setSelected(true),
}), []);
return (
<MapLibreMapView state={mapState} onMapClick={() => setSelected(false)}>
<Marker state={marker} />
{selected && (
<InfoBubble marker={marker}>Hello, MapConductor</InfoBubble>
)}
</MapLibreMapView>
);
}RESULT · What you should see
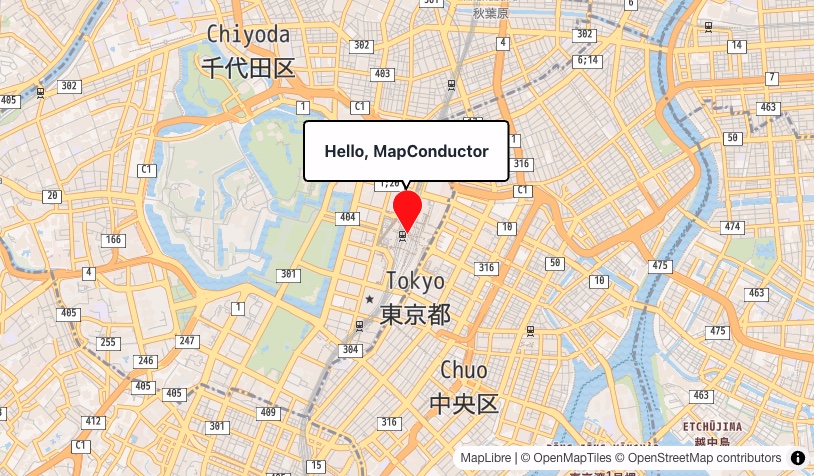
A map centred on Tokyo Station with a single marker. Tap the marker and a “Hello, MapConductor” bubble appears — that is the whole tutorial working.
04 · Swap the provider
Keep the screen code and swap the dependency and view name to run on a different provider. What changes is the setup: obtaining a key, and how that SDK wants to be initialised.