 MapConductor
MapLibre로 최초의 지도를 내기
MapConductor로 MapLibre의 지도를 표시하기까지의 절차입니다. 셋업은 플랫폼마다 다르지만, 지도와 마커를 쓰는 코드는 같은 사고방식으로 통합니다.
01 · 설치
의존 관계에 core와 for-maplibre를 추가합니다. 다른 프로바이더를 쓰는 경우는 모듈을 교체하기만 하면 됩니다.
dependencyResolutionManagement {
    repositories {
        google()
        mavenCentral()
    }
}dependencies {
implementation(platform("com.mapconductor:mapconductor-bom:1.3.1"))
implementation("com.mapconductor:core")
implementation("com.mapconductor:for-maplibre")
// 선택: compose / icons / heatmap / marker-clustering / geojson / kml
}dependencies: [
.package(url: "https://github.com/MapConductor/ios-sdk-core", from: "1.3.1"),
.package(url: "https://github.com/MapConductor/ios-for-maplibre", from: "1.3.1"),
].target(
name: "YourApp",
dependencies: [
.product(name: "MapConductorCore", package: "ios-sdk-core"),
.product(name: "MapConductorForMapLibre", package: "ios-for-maplibre"),
]
)npm install @mapconductor/js-sdk-core \
@mapconductor/js-sdk-react \
@mapconductor/react-for-maplibreimport { defineConfig } from 'vite';
import react from '@vitejs/plugin-react';
export default defineConfig({
optimizeDeps: {
exclude: ["@mapconductor/react-for-maplibre", "@mapconductor/js-sdk-core"],
},
plugins: [react()],
});Vite의 의존 사전 번들에서 프로바이더를 뺍니다. maplibre-gl v6은 워커를 URL로 읽어 들이기 때문에, 사전 번들되면 .vite/deps 아래에 워커의 파일이 출력되지 않아 읽기에 실패합니다.
02 · 타일을 정한다
MapLibre 자체에 API 키는 없습니다. 지도의 겉모습은 타일의 배포처로 정해집니다.
데모 타일로 시작하기
MapLibreDesign.DemoTiles / OpenMapTiles를 그대로 지정하면, 키 없이 동작을 확인할 수 있습니다.
본번은 호스팅을 준비
MapTiler 등의 타일 배포를 쓰는 경우는, 각 서비스의 키를 스타일 URL에 설정합니다.
데모 타일은 동작 확인용입니다. 본번 앱에서는 자체 또는 상용의 타일 배포를 쓰세요.
03 · Hello Map
카메라 위치를 가지는 상태 객체를 만들어, 지도 뷰에 넘깁니다. 마커나 정보 버블 같은 오버레이는 자식 요소로 선언합니다. 마커가 탭되면 정보 버블을 내고, 지도가 탭되면 닫습니다.
@Composable
fun SimpleMapScreen(modifier: Modifier) {
    var selected by remember { mutableStateOf<MarkerState?>(null) }

    val mapState = rememberMapLibreMapViewState(
        cameraPosition = MapCameraPosition(
            position = GeoPoint(35.6812, 139.7671),
            zoom = 14.0,
        ),
        mapDesign = MapLibreDesign.OsmBright,
    )
    val markerState = remember {
        MarkerState(
            position = GeoPoint(35.6812, 139.7671),
            onClick = { selected = it },
        )
    }

    MapLibreMapView(
        modifier = modifier,
        state = mapState,
        onMapClick = { selected = null },
    ) {
        Marker(markerState)
        selected?.let {
            InfoBubble(marker = it) { Text("Hello, MapConductor") }
        }
    }
}import SwiftUI
import MapConductorCore
import MapConductorForMapLibre
struct ContentView: View {
@StateObject private var mapState = MapLibreViewState(
mapDesignType: MapLibreDesign.OsmBright,
cameraPosition: MapCameraPosition(
position: GeoPoint(latitude: 35.6812, longitude: 139.7671),
zoom: 14
)
)
@State private var selected: MarkerState?
var body: some View {
MapLibreMapView(state: mapState, onMapClick: { _ in selected = nil }) {
Marker(
position: GeoPoint(latitude: 35.6812, longitude: 139.7671),
onClick: { selected = $0 }
)
if let selected {
InfoBubble(marker: selected) { Text("Hello, MapConductor") }
}
}
}
}import { useMemo, useState } from 'react';
import { createGeoPoint, createMapCameraPosition, createMarkerState }
from '@mapconductor/js-sdk-core';
import { InfoBubble, Marker } from '@mapconductor/js-sdk-react';
import { MapLibreDesign, MapLibreMapView, useMapLibreViewState }
from '@mapconductor/react-for-maplibre';
import '@mapconductor/react-for-maplibre/style.css';
const TOKYO = createGeoPoint({ latitude: 35.6812, longitude: 139.7671 });
export function HelloMap() {
const mapState = useMapLibreViewState({
mapDesignType: MapLibreDesign.OsmBright,
cameraPosition: createMapCameraPosition({ position: TOKYO, zoom: 14 }),
});
const [selected, setSelected] = useState(false);
const marker = useMemo(() =>
createMarkerState({
id: 'hello',
position: TOKYO,
onClick: () => setSelected(true),
}), []);
return (
<MapLibreMapView state={mapState} onMapClick={() => setSelected(false)}>
<Marker state={marker} />
{selected && (
<InfoBubble marker={marker}>Hello, MapConductor</InfoBubble>
)}
</MapLibreMapView>
);
}RESULT · 움직이는 곳까지
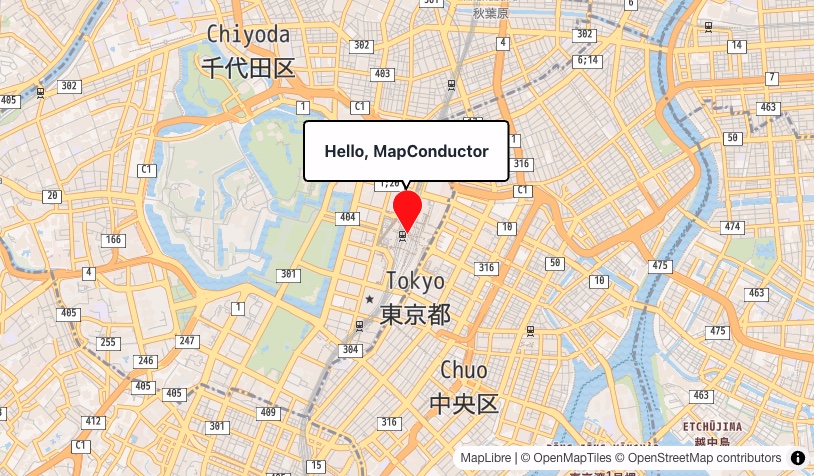
도쿄역을 중심으로 지도가 표시되고, 마커가 하나 섭니다. 마커를 탭해 「Hello, MapConductor」의 말풍선이 나오면 완료입니다.
04 · 프로바이더를 교체하기
같은 화면 코드인 채로, 의존 모듈과 뷰 이름을 교체하면 다른 프로바이더에서 동작합니다. 바뀌는 것은 도입 절차 — 키의 취득과 초기화의 작법 — 뿐입니다.