 MapConductor
แสดงแผนที่แรกด้วย MapLibre
ขั้นตอนการแสดงแผนที่ MapLibre ด้วย MapConductor การติดตั้งแตกต่างกันไปตามแพลตฟอร์ม แต่แนวคิดในการเขียนโค้ดสำหรับแผนที่และมาร์คเกอร์เหมือนกัน
01 · การติดตั้ง
เพิ่ม `core` และ `for-maplibre` ลงในการพึ่งพา หากคุณใช้ผู้ให้บริการรายอื่น เพียงแค่สลับโมดูล
dependencyResolutionManagement {
    repositories {
        google()
        mavenCentral()
    }
}dependencies {
implementation(platform("com.mapconductor:mapconductor-bom:1.3.1"))
implementation("com.mapconductor:core")
implementation("com.mapconductor:for-maplibre")
// ไม่บังคับ: compose / icons / heatmap / marker-clustering / geojson / kml
}dependencies: [
.package(url: "https://github.com/MapConductor/ios-sdk-core", from: "1.3.1"),
.package(url: "https://github.com/MapConductor/ios-for-maplibre", from: "1.3.1"),
].target(
name: "YourApp",
dependencies: [
.product(name: "MapConductorCore", package: "ios-sdk-core"),
.product(name: "MapConductorForMapLibre", package: "ios-for-maplibre"),
]
)npm install @mapconductor/js-sdk-core \
@mapconductor/js-sdk-react \
@mapconductor/react-for-maplibreimport { defineConfig } from 'vite';
import react from '@vitejs/plugin-react';
export default defineConfig({
optimizeDeps: {
exclude: ["@mapconductor/react-for-maplibre", "@mapconductor/js-sdk-core"],
},
plugins: [react()],
});ยกเว้นผู้ให้บริการออกจากการบันเดิลล่วงหน้าของ Vite `maplibre-gl` v6 โหลดเวิร์กเกอร์ผ่าน URL หากถูกบันเดิลล่วงหน้า ไฟล์เวิร์กเกอร์จะไม่ถูกสร้างภายใต้ `.vite/deps` และการโหลดจะล้มเหลว
02 · กำหนดกระเบื้อง
MapLibre เองไม่มีคีย์ API รูปลักษณ์ของแผนที่ถูกกำหนดโดยแหล่งที่มาของกระเบื้อง
เริ่มต้นด้วย demo tiles
หากระบุ MapLibreDesign.DemoTiles / OpenMapTiles โดยตรง คุณสามารถตรวจสอบการทำงานได้โดยไม่ต้องมีคีย์
เตรียมการโฮสต์สำหรับการใช้งานจริง
หากคุณใช้บริการจัดส่งไทล์ เช่น MapTiler ให้ตั้งค่าคีย์ของแต่ละบริการใน styleURL
demo tiles มีไว้เพื่อตรวจสอบการทำงานเท่านั้น ในแอปพลิเคชันเพื่อการใช้งานจริง โปรดใช้บริการจัดส่งไทล์ของคุณเองหรือบริการเชิงพาณิชย์
03 · Hello Map
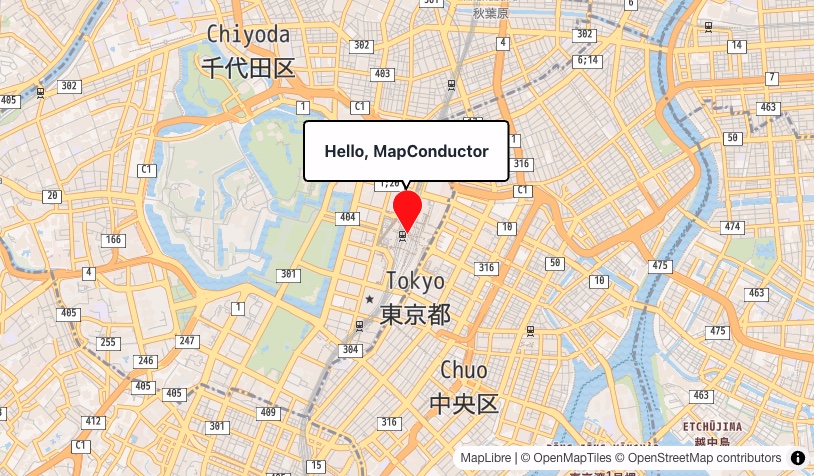
สร้างออบเจ็กต์สถานะที่มีตำแหน่งกล้องและส่งต่อไปยังมุมมองแผนที่ ซ้อนทับเช่นมาร์คเกอร์และบับเบิลข้อมูลจะถูกประกาศเป็นองค์ประกอบย่อย เมื่อแตะมาร์คเกอร์จะแสดงบับเบิลข้อมูล เมื่อแตะแผนที่จะปิดลง
@Composable
fun SimpleMapScreen(modifier: Modifier) {
    var selected by remember { mutableStateOf<MarkerState?>(null) }

    val mapState = rememberMapLibreMapViewState(
        cameraPosition = MapCameraPosition(
            position = GeoPoint(35.6812, 139.7671),
            zoom = 14.0,
        ),
        mapDesign = MapLibreDesign.OsmBright,
    )
    val markerState = remember {
        MarkerState(
            position = GeoPoint(35.6812, 139.7671),
            onClick = { selected = it },
        )
    }

    MapLibreMapView(
        modifier = modifier,
        state = mapState,
        onMapClick = { selected = null },
    ) {
        Marker(markerState)
        selected?.let {
            InfoBubble(marker = it) { Text("Hello, MapConductor") }
        }
    }
}import SwiftUI
import MapConductorCore
import MapConductorForMapLibre
struct ContentView: View {
@StateObject private var mapState = MapLibreViewState(
mapDesignType: MapLibreDesign.OsmBright,
cameraPosition: MapCameraPosition(
position: GeoPoint(latitude: 35.6812, longitude: 139.7671),
zoom: 14
)
)
@State private var selected: MarkerState?
var body: some View {
MapLibreMapView(state: mapState, onMapClick: { _ in selected = nil }) {
Marker(
position: GeoPoint(latitude: 35.6812, longitude: 139.7671),
onClick: { selected = $0 }
)
if let selected {
InfoBubble(marker: selected) { Text("Hello, MapConductor") }
}
}
}
}import { useMemo, useState } from 'react';
import { createGeoPoint, createMapCameraPosition, createMarkerState }
from '@mapconductor/js-sdk-core';
import { InfoBubble, Marker } from '@mapconductor/js-sdk-react';
import { MapLibreDesign, MapLibreMapView, useMapLibreViewState }
from '@mapconductor/react-for-maplibre';
import '@mapconductor/react-for-maplibre/style.css';
const TOKYO = createGeoPoint({ latitude: 35.6812, longitude: 139.7671 });
export function HelloMap() {
const mapState = useMapLibreViewState({
mapDesignType: MapLibreDesign.OsmBright,
cameraPosition: createMapCameraPosition({ position: TOKYO, zoom: 14 }),
});
const [selected, setSelected] = useState(false);
const marker = useMemo(() =>
createMarkerState({
id: 'hello',
position: TOKYO,
onClick: () => setSelected(true),
}), []);
return (
<MapLibreMapView state={mapState} onMapClick={() => setSelected(false)}>
<Marker state={marker} />
{selected && (
<InfoBubble marker={marker}>Hello, MapConductor</InfoBubble>
)}
</MapLibreMapView>
);
}RESULT · จนถึงขั้นตอนการทำงาน
แผนที่จะแสดงโดยมีสถานีโตเกียวเป็นศูนย์กลางและมีมาร์คเกอร์หนึ่งตัว เมื่อแตะมาร์คเกอร์และป๊อปอัป "Hello, MapConductor" ปรากฏขึ้น ถือว่าเสร็จสิ้น
04 · เปลี่ยนผู้ให้บริการ
ด้วยโค้ดหน้าจอเดิม สามารถใช้งานกับผู้ให้บริการอื่นได้โดยเพียงแค่เปลี่ยนโมดูลการพึ่งพาและชื่อมุมมอง สิ่งที่เปลี่ยนไปมีเพียงขั้นตอนการแนะนำ — การรับคีย์และวิธีการเริ่มต้น