 MapConductor
ข้อมูลฟอง (InfoBubble)
คุณสามารถเขียนคำบรรยายที่เชื่อมโยงกับมาร์กเกอร์ได้โดยตรงในโค้ด UI ของแต่ละแพลตฟอร์ม เนื้อหาคือ Composable ใน Compose, View ใน SwiftUI หรือองค์ประกอบใน React SDK จะดูแลเฉพาะการจัดแนวและการวาดหางเท่านั้น
01 · กลไก
ร่วมกันสำหรับทั้ง 3 แพลตฟอร์ม: โครงสร้างคือการถือมาร์กเกอร์ที่เลือกไว้เป็นสถานะและวาดฟองเฉพาะเมื่อถูกเลือกเท่านั้น การเปิดและปิดฟองถูกตัดสินโดยสถานะของแอป ไม่ใช่ SDK
มีสถานะการเลือก
เก็บเครื่องหมาย (หรือ ID) ที่เลือกไว้เป็น state หากแสดงพร้อมกันหลายรายการ ให้ใช้ Set
วางเป็นรายการย่อยของแผนที่
จัดเรียง Marker และ InfoBubble เป็นรายการย่อยของคอนเทนเนอร์แผนที่ และวาด InfoBubble เมื่อถูกเลือกเท่านั้น
ปิดเมื่อแตะที่แผนที่
ยกเลิกการเลือกใน onMapClick ของแผนที่ onClick ของเครื่องหมายตั้งค่าการเลือก
02 · 4 รูปแบบ
4 หน้าใต้ `infobubble` ในแอปตัวอย่างสอดคล้องกับรูปแบบการใช้งาน 4 รูปแบบ เมื่อคุณเลือกรูปแบบและแพลตฟอร์ม จะมีการแสดงโค้ดของตัวอย่างที่เกี่ยวข้อง
ข้อความหนึ่งบรรทัด
การกำหนดค่าขั้นต่ำ แสดงสตริงจาก `extra` ของมาร์กเกอร์ในบรรทัดเดียว เนื่องจากกรอบ หาง และระยะห่างมีค่าเริ่มต้น คุณต้องเขียนเฉพาะข้อความเนื้อหาเท่านั้น
var selectedMarker by remember { mutableStateOf<MarkerState?>(null) }
val markerState = remember {
    MarkerState(
        position = GeoPoint.fromLatLong(37.7749, -122.4194),
        icon = DefaultMarkerIcon(fillColor = Color.Blue, label = "SF"),
        extra = "San Francisco - The Golden Gate City",
        onClick = { selectedMarker = it },
    )
}

MapViewContainer(
    modifier = Modifier.fillMaxSize(),
    state = mapViewState,
    onMapClick = { selectedMarker = null },
    onMapLoaded = { selectedMarker = markerState },
) {
    Marker(markerState)

    selectedMarker?.let { marker ->
        InfoBubble(marker = marker) {
            Text(
                text = marker.extra as? String ?: "No information",
                color = MaterialTheme.colorScheme.primary,
                modifier = Modifier.padding(4.dp),
            )
        }
    }
}@State private var selectedMarker: MarkerState? = nil
@StateObject private var markerState = MarkerState(
position: GeoPoint(latitude: 37.7749, longitude: -122.4194),
extra: "San Francisco - The Golden Gate City",
icon: DefaultMarkerIcon(fillColor: UIColor.systemBlue, label: "SF")
)
SampleMapView(
provider: $provider,
/* ... provider states ... */
onMapClick: { _ in selectedMarker = nil }
) {
Marker(state: markerState)
if let marker = selectedMarker {
InfoBubble(marker: marker) {
Text(marker.extra as! String)
.foregroundColor(.accentColor)
.padding(4)
}
}
}
.onAppear {
markerState.onClick = { marker in selectedMarker = marker }
}const [selectedId, setSelectedId] = useState<string | null>('simple-text-bubble');
const marker = useMemo(() => createMarkerState({
id: 'simple-text-bubble',
position: createGeoPoint({ latitude: 37.7749, longitude: -122.4194 }),
icon: new ColorDefaultIcon('#2563eb', { label: 'SF', labelTextColor: '#ffffff' }),
extra: 'San Francisco - The Golden Gate City',
onClick: state => setSelectedId(state.id),
}), []);
return (
<MapViewContainer initialCamera={INIT_CAMERA} onMapClick={() => setSelectedId(null)}>
<Marker state={marker} />
{selectedId === marker.id && (
<InfoBubble marker={marker}>
<div className="bubble-content simple-text-bubble">
{marker.extra as string}
</div>
</InfoBubble>
)}
</MapViewContainer>
);หางเริ่มต้นอยู่เหนือมาร์กเกอร์พอดี (tailOffset x:0.5 / y:1.0)
เปลี่ยนสไตล์
รูปแบบในการเปลี่ยนสไตล์ของกรอบ หากคุณเปลี่ยนเฉพาะสีและมุมมน Android และ React ใช้อาร์กิวเมนต์แยกต่างหาก iOS ส่ง `InfoBubbleStyle` หากคุณวาดกรอบและหางเอง ทั้ง 3 แพลตฟอร์มใช้ `InfoBubbleCustom` (Compose: `Canvas`, SwiftUI: `Shape`, React: CSS `::before` / `::after`)
val markerState1 by remember {
    mutableStateOf(
        MarkerState(
            id = "marker1",
            position = GeoPoint.fromLatLong(37.7749, -122.4194),
            icon = DefaultMarkerIcon(
                fillColor = Color.Blue,
                infoAnchor = Offset(0.5f, 0.25f),
                label = "1",
            ),
            draggable = true,
            onClick = onMarkerClick,
        ),
    )
}

selectedMarker?.let { marker ->
    val text = GeoPoint.from(marker.position).toUrlValue(6)
    InfoBubbleCustom(
        marker = marker,
        tailOffset = Offset(0f, 0.5f), // เชื่อมที่กึ่งกลางขอบซ้าย
    ) {
        RightTailInfoBubble(
            bubbleColor = Color.White,
            borderColor = Color.Black,
        ) {
            Text(text = text, color = MaterialTheme.colorScheme.primary)
        }
    }
}@Composable
private fun RightTailInfoBubble(
bubbleColor: Color,
borderColor: Color,
contentPadding: Dp = 8.dp,
cornerRadius: Dp = 4.dp,
tailSize: Dp = 8.dp,
content: @Composable () -> Unit,
) {
Box(modifier = Modifier.wrapContentSize()) {
Canvas(modifier = Modifier.matchParentSize()) {
val path = Path().apply {
// วาดสี่เหลี่ยมมุมมนแล้วเติมหางสามเหลี่ยมที่กึ่งกลางขอบซ้าย
lineTo(tail, height / 2 + tail / 2)
lineTo(0f, height / 2)
lineTo(tail, height / 2 - tail / 2)
close()
}
drawPath(path, color = bubbleColor, style = Fill)
drawPath(path, color = borderColor, style = Stroke(width = 2f))
}
Box(modifier = Modifier.padding(start = contentPadding + tailSize)) {
content()
}
}
}private let style = InfoBubbleStyle(
bubbleColor: Color.black.opacity(0.85),
borderColor: Color.white,
contentPadding: 10,
cornerRadius: 10,
tailSize: 10
)
SampleMapView(
provider: $provider,
/* ... provider states ... */
onMapClick: { point in markerState.position = point }
) {
Marker(state: markerState)
InfoBubble(marker: markerState, style: style) {
VStack(alignment: .leading, spacing: 6) {
Text("Night Mode")
.font(.headline)
.foregroundColor(.white)
Text("Custom style bubble")
.font(.subheadline)
.foregroundColor(.white.opacity(0.8))
}
}
// เมื่อจะวาดกรอบทั้งหมดเอง
Marker(state: customMarkerState)
InfoBubbleCustom(
marker: customMarkerState,
tailOffset: CGPoint(x: 0, y: 0.5) // เชื่อมที่กึ่งกลางขอบซ้าย
) {
RightTailInfoBubble(bubbleColor: .white, borderColor: .black) {
Text("Fully custom bubble")
.font(.subheadline)
.foregroundColor(.accentColor)
}
}
}ตัวอย่าง iOS แทนที่สี ระยะห่าง และขนาดหางผ่าน `InfoBubbleStyle` แทนที่จะวาดหางที่ชี้ไปทางขวาเอง รูปลักษณ์จะแตกต่างจากเวอร์ชัน Android/React
const marker1 = createMarkerState({
  id: 'marker1',
  position: createGeoPoint({ latitude: 37.7749, longitude: -122.4194 }),
  icon: new ColorDefaultIcon('#2563eb', {
    label: '1',
    labelTextColor: '#ffffff',
    infoAnchor: { x: 0.5, y: 0.25 },
  }),
  draggable: true,
  onClick: state => setSelectedId(state.id),
});

const activeMarker = markers.find(m => m.id === selectedId);

<Markers states={markers} />
{activeMarker && (
  <InfoBubbleCustom marker={activeMarker} tailOffset={{ x: 0, y: 0.5 }}>
    <div className="right-tail-info-bubble">
      {activeMarker.position.toUrlValue(6)}
    </div>
  </InfoBubbleCustom>
)}.right-tail-info-bubble {
position: relative;
width: max-content;
max-width: 220px;
padding: 8px;
margin-left: 8px;
border: 2px solid #000;
border-radius: 4px;
background: #fff;
color: #2563eb;
}
/* ใช้ ::before / ::after ซ้อนสามเหลี่ยมชี้ซ้ายเป็นหาง */จุดเชื่อมกำหนดโดย tailOffset (ฝั่งบับเบิล) และ infoAnchor ของไอคอน (ฝั่งมาร์กเกอร์)
เนื้อหาที่หลากหลาย
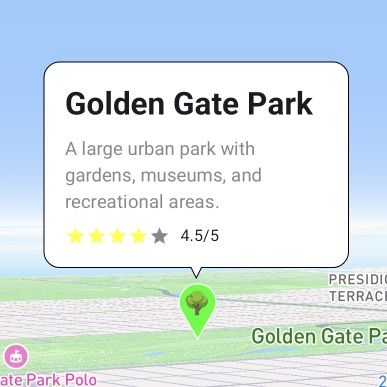
วางออบเจกต์ใน `extra` และฝังเลย์เอาต์ที่มีหัวข้อ คำอธิบาย และการให้คะแนน สามารถปรับกรอบได้ผ่าน `bubbleColor` / `borderColor` / `contentPadding` / `cornerRadius` และโค้ดของเนื้อหาสามารถมุ่งเน้นที่เลย์เอาต์ของเนื้อหาได้เท่านั้น
data class LocationInfo(
    val name: String,
    val description: String,
    val rating: Float,
) : Serializable

selectedMarker?.let { marker ->
    val info = marker.extra as? LocationInfo ?: return@let
    InfoBubble(
        marker = marker,
        bubbleColor = if (isDarkTheme) Color.Black else Color.White,
        borderColor = if (isDarkTheme) Color.Gray else Color.Black,
        contentPadding = 16.dp,
        cornerRadius = 12.dp,
    ) {
        Column(modifier = Modifier.width(200.dp)) {
            Text(info.name, style = MaterialTheme.typography.headlineSmall,
                fontWeight = FontWeight.Bold)
            Spacer(Modifier.height(8.dp))
            Text(info.description, style = MaterialTheme.typography.bodyMedium)
            Spacer(Modifier.height(8.dp))
            Row(verticalAlignment = Alignment.CenterVertically) {
                repeat(5) { index ->
                    Icon(Icons.Default.Star, contentDescription = null,
                        tint = if (index < info.rating.toInt()) Color.Yellow else Color.Gray,
                        modifier = Modifier.size(16.dp))
                }
                Text(" ${info.rating}/5", style = MaterialTheme.typography.bodySmall)
            }
        }
    }
}@StateObject private var markerState = MarkerState(
position: GeoPoint(latitude: 37.7694, longitude: -122.4862),
extra: LocationInfo(
name: "Golden Gate Park",
description: "A large urban park with gardens, museums, ...",
rating: 4.5
),
icon: DefaultMarkerIcon(fillColor: UIColor.systemGreen, label: "P")
)
if let marker = selectedMarker,
let info = marker.extra as? LocationInfo {
InfoBubble(marker: marker, style: bubbleStyle()) {
VStack(alignment: .leading, spacing: 8) {
Text(info.name).font(.headline).fontWeight(.bold)
Text(info.description)
.font(.subheadline)
.foregroundColor(.gray)
HStack(spacing: 4) {
ForEach(0..<5, id: \.self) { index in
Image(systemName: "star.fill")
.foregroundColor(index < Int(info.rating) ? .yellow : .gray)
.font(.system(size: 12))
}
Text(String(format: " %.1f/5", info.rating)).font(.caption)
}
}
.frame(width: 200, alignment: .leading)
}
}interface LocationInfo extends Record<string, unknown> {
name: string; description: string; rating: number;
}
const marker = useMemo(() => createMarkerState({
id: 'golden-gate-park',
position: createGeoPoint({ latitude: 37.7694, longitude: -122.4862 }),
icon: new ColorDefaultIcon('#22c55e', { label: '🌳' }),
extra: { name: 'Golden Gate Park', description: '…', rating: 4.5 },
onClick: state => setSelectedId(state.id),
}), []);
const info = marker.extra as LocationInfo;
<InfoBubble
marker={marker}
bubbleColor="#ffffff"
borderColor="#000000"
contentPadding={16}
cornerRadius={12}
>
<div className="rich-location-bubble">
<strong>{info.name}</strong>
<p>{info.description}</p>
<div className="rating-row">…</div>
</div>
</InfoBubble>A large urban park with gardens, museums, and recreational areas.
ตัวอย่างของ Android และ iOS ยังสลับสีกรอบและพื้นหลังสำหรับโหมดมืดด้วย
แสดงหลายรายการพร้อมกัน
หากคุณเก็บการเลือกไว้เป็น Set คุณสามารถเปิดหลายฟองอากาศไว้พร้อมกันได้ วาด InfoBubble สำหรับเครื่องหมายที่เปิดอยู่เท่านั้นและเพิ่มการทำงานของการแตะในเนื้อหาเพื่อให้ฟองอากาศปิดตัวเองได้
var selectedMarkers by remember { mutableStateOf(setOf<String>()) }

val onMarkerClick: OnMarkerEventHandler = { markerState ->
    selectedMarkers =
        if (selectedMarkers.contains(markerState.id)) {
            selectedMarkers - markerState.id
        } else {
            selectedMarkers + markerState.id
        }
}

MapViewContainer(
    state = mapViewState,
    onMapClick = { selectedMarkers = emptySet() },
) {
    markerStates.forEach { markerState ->
        Marker(markerState)

        if (selectedMarkers.contains(markerState.id)) {
            InfoBubble(
                marker = markerState,
                bubbleColor = Color.White,
                borderColor = Color.Black,
            ) {
                Column(modifier = Modifier.clickable(true, onClick = {
                    selectedMarkers = selectedMarkers - markerState.id
                })) {
                    Text(markerState.extra as String, fontWeight = FontWeight.Bold)
                    Text("Tap to close", color = Color.Gray)
                }
            }
        }
    }
}@State private var selectedMarkers: Set<String> = []
SampleMapView(
provider: $provider,
/* ... provider states ... */
onMapClick: { _ in selectedMarkers = [] }
) {
Marker(state: markerState1)
if selectedMarkers.contains(markerState1.id) {
InfoBubble(marker: markerState1) {
VStack(alignment: .leading, spacing: 4) {
Text(markerState1.extra as? String ?? "Unknown").font(.headline)
Text("Tap to close").font(.subheadline).foregroundColor(.gray)
}
}
}
// markerState2 และ markerState3 มีรูปแบบเดียวกัน
}
.onAppear {
[markerState1, markerState2, markerState3].forEach { marker in
marker.onClick = { clicked in
if selectedMarkers.contains(clicked.id) {
selectedMarkers.remove(clicked.id)
} else {
selectedMarkers.insert(clicked.id)
}
}
}
}const [selectedIds, setSelectedIds] = useState<Set<string>>(
() => new Set(['marker_0', 'marker_1', 'marker_2'])
);
// สลับค่าใน onClick
onClick: state => setSelectedIds(prev => {
const next = new Set(prev);
next.has(state.id) ? next.delete(state.id) : next.add(state.id);
return next;
}),
<Markers states={markers} />
{markers.map(marker =>
selectedIds.has(marker.id) ? (
<InfoBubble key={marker.id} marker={marker}
bubbleColor="#ffffff" borderColor="#000000">
<button type="button" className="multi-bubble-content"
onClick={() => close(marker.id)}>
<strong>{marker.extra as string}</strong>
<span>Tap to close</span>
</button>
</InfoBubble>
) : null
)}ในทุกตัวอย่าง การแตะแผนที่จะปิดทั้งหมด (กลับเป็น Set ว่าง)
03 · API
InfoBubble เป็นคอมโพเนนต์ระดับสูงที่วาดกรอบพร้อมหาง และ InfoBubbleCustom เป็นคอมโพเนนต์ระดับต่ำที่ดำเนินการจัดตำแหน่งเท่านั้น iOS ส่งอาร์กิวเมนต์สไตล์รวมกันใน InfoBubbleStyle
iOS ส่งโครงสร้างนี้ไปยัง style แบบรวมแทนที่จะเป็นอาร์กิวเมนต์แยก
InfoBubbleStyle(
  bubbleColor: Color,
  borderColor: Color,
  contentPadding: CGFloat,
  cornerRadius: CGFloat,
  tailSize: CGFloat
)
รูปแบบที่วาดกรอบและหางเอง SDK รับผิดชอบเฉพาะการจัดตำแหน่ง
marker: MarkerState
tailOffset: Offset   // ios: CGPoint
content / children
แสดงบับเบิ้ลที่พิกัดโดยตรงไม่ใช่ที่เครื่องหมาย ทั้ง 3 แพลตฟอร์มสอดคล้องกันโดยส่ง position ไปยัง InfoBubble (โอเวอร์โหลดของ InfoBubble(position:) ใน Compose/iOS)
position: GeoPoint
// react: <InfoBubble position=… />
// compose / ios: InfoBubble(position:)
04 · หมายเหตุ
ไม่ซ้อนทับแม้ไม่ได้ระบุไอคอน
เครื่องหมายที่ไม่ได้ส่ง icon จะถือเป็นพินเริ่มต้น (48px อ้างอิงขอบล่าง) และบับเบิ้ลจะเลื่อนตามขนาดจริงของมัน จะไม่ทับซ้อนกับเครื่องหมาย
เลื่อนด้วย infoAnchor
จุดเชื่อมต่อด้านไอคอนสามารถเปลี่ยนแปลงได้ด้วย infoAnchor (Offset ใน Compose, x/y ใน React) บับเบิ้ลจะตามไปด้วยแม้ระหว่างการลาก
เนื้อหาภายในบับเบิ้ลสามารถรับเหตุการณ์ได้
วาง clickable ของ Compose, เจสเจอร์ของ SwiftUI และ onClick ของ React ได้โดยตรง ทำงานแยกจาก onMapClick ของแผนที่ ดังนั้นการดำเนินการปิดสามารถอยู่ที่ฝั่งเนื้อหาได้