 MapConductor
Fyrsta kortið þitt með MapLibre
Hvernig teikna má MapLibre-kort með MapConductor. Uppsetningin er ólík eftir vettvangi, en kóðinn sem teiknar kortið og yfirlög þess fylgir sama líkani alls staðar.
01 · Uppsetning
Bættu core og for-maplibre við viðföngin þín. Að nota annan þjónustuaðila þýðir að skipta út þeirri einu einingu.
dependencyResolutionManagement {
    repositories {
        google()
        mavenCentral()
    }
}dependencies {
implementation(platform("com.mapconductor:mapconductor-bom:1.3.1"))
implementation("com.mapconductor:core")
implementation("com.mapconductor:for-maplibre")
// valfrjálst: compose / icons / heatmap / marker-clustering / geojson / kml
}dependencies: [
.package(url: "https://github.com/MapConductor/ios-sdk-core", from: "1.3.1"),
.package(url: "https://github.com/MapConductor/ios-for-maplibre", from: "1.3.1"),
].target(
name: "YourApp",
dependencies: [
.product(name: "MapConductorCore", package: "ios-sdk-core"),
.product(name: "MapConductorForMapLibre", package: "ios-for-maplibre"),
]
)npm install @mapconductor/js-sdk-core \
@mapconductor/js-sdk-react \
@mapconductor/react-for-maplibreimport { defineConfig } from 'vite';
import react from '@vitejs/plugin-react';
export default defineConfig({
optimizeDeps: {
exclude: ["@mapconductor/react-for-maplibre", "@mapconductor/js-sdk-core"],
},
plugins: [react()],
});Haltu þjónustuaðilanum utan við forpökkun viðfanga í Vite. maplibre-gl v6 hleður verkamanni sínum eftir vefslóð, og forpökkunin skilar þeirri skrá ekki inn í .vite/deps, svo beiðnin misheppnast.
02 · Veldu flísarnar þínar
MapLibre sjálft þarf engan API-lykil — útlit kortsins ræðst af því hvaðan flísarnar koma.
Byrjaðu á kynningarflísum
Sendu MapLibreDesign.DemoTiles eða OpenMapTiles til að fá virkt kort án nokkurs lykils.
Hýstu flísar fyrir raunnotkun
Fyrir hýsta þjónustu á borð við MapTiler skaltu setja lykil þeirrar þjónustu inn í stílslóðina.
Kynningarflísar eru aðeins til prófunar. Notaðu þínar eigin eða viðskiptalega flísaþjónustu í raunnotkun.
03 · Hello Map
Búðu til stöðuhlut sem geymir stöðu myndavélarinnar og réttu hann kortasýninni. Yfirlögin — merkið og upplýsingablaðran — eru lýst sem börnum: snerting á merkið sýnir blöðruna, snerting á kortið lokar henni.
@Composable
fun SimpleMapScreen(modifier: Modifier) {
    var selected by remember { mutableStateOf<MarkerState?>(null) }

    val mapState = rememberMapLibreMapViewState(
        cameraPosition = MapCameraPosition(
            position = GeoPoint(35.6812, 139.7671),
            zoom = 14.0,
        ),
        mapDesign = MapLibreDesign.OsmBright,
    )
    val markerState = remember {
        MarkerState(
            position = GeoPoint(35.6812, 139.7671),
            onClick = { selected = it },
        )
    }

    MapLibreMapView(
        modifier = modifier,
        state = mapState,
        onMapClick = { selected = null },
    ) {
        Marker(markerState)
        selected?.let {
            InfoBubble(marker = it) { Text("Hello, MapConductor") }
        }
    }
}import SwiftUI
import MapConductorCore
import MapConductorForMapLibre
struct ContentView: View {
@StateObject private var mapState = MapLibreViewState(
mapDesignType: MapLibreDesign.OsmBright,
cameraPosition: MapCameraPosition(
position: GeoPoint(latitude: 35.6812, longitude: 139.7671),
zoom: 14
)
)
@State private var selected: MarkerState?
var body: some View {
MapLibreMapView(state: mapState, onMapClick: { _ in selected = nil }) {
Marker(
position: GeoPoint(latitude: 35.6812, longitude: 139.7671),
onClick: { selected = $0 }
)
if let selected {
InfoBubble(marker: selected) { Text("Hello, MapConductor") }
}
}
}
}import { useMemo, useState } from 'react';
import { createGeoPoint, createMapCameraPosition, createMarkerState }
from '@mapconductor/js-sdk-core';
import { InfoBubble, Marker } from '@mapconductor/js-sdk-react';
import { MapLibreDesign, MapLibreMapView, useMapLibreViewState }
from '@mapconductor/react-for-maplibre';
import '@mapconductor/react-for-maplibre/style.css';
const TOKYO = createGeoPoint({ latitude: 35.6812, longitude: 139.7671 });
export function HelloMap() {
const mapState = useMapLibreViewState({
mapDesignType: MapLibreDesign.OsmBright,
cameraPosition: createMapCameraPosition({ position: TOKYO, zoom: 14 }),
});
const [selected, setSelected] = useState(false);
const marker = useMemo(() =>
createMarkerState({
id: 'hello',
position: TOKYO,
onClick: () => setSelected(true),
}), []);
return (
<MapLibreMapView state={mapState} onMapClick={() => setSelected(false)}>
<Marker state={marker} />
{selected && (
<InfoBubble marker={marker}>Hello, MapConductor</InfoBubble>
)}
</MapLibreMapView>
);
}RESULT · Það sem þú ættir að sjá
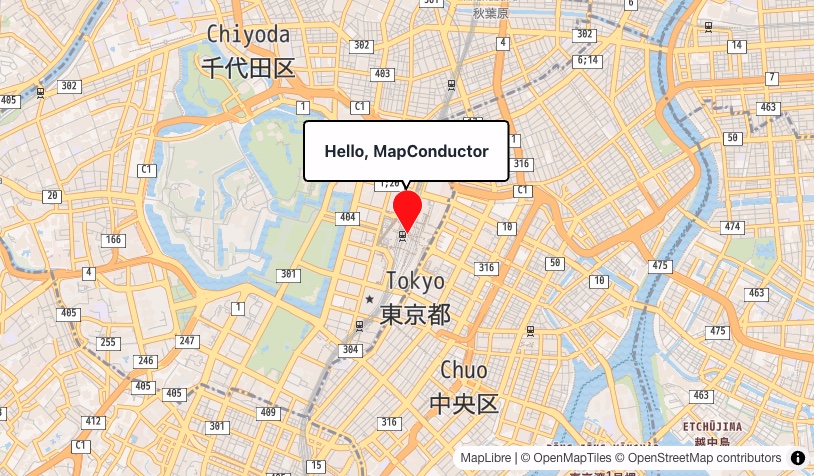
Kort miðað á Tókýóstöð með einu merki. Snertu merkið og upp kemur blaðra með „Hello, MapConductor“ — þá er öll kennslan farin að virka.
04 · Skiptu um þjónustuaðila
Haltu skjákóðanum og skiptu um viðfangið og heiti sýnarinnar til að keyra á öðrum þjónustuaðila. Það sem breytist er uppsetningin: að fá lykil, og hvernig það SDK vill láta frumstilla sig.